How to remove a personnel number in 1C. Basic HR accounting settings. Staffing is maintained
Reading time:
What questions were most often asked by 1C: Accounting 8 users? If you have any other questions, ask them in the comments, experts will answer you.Question 1: when accruing salary, I cannot set/change the accrual date
After updating to version 3.0.54.20, the “Payroll” document was modified, and the “Document Date” field is set by default to the last day of the month, which is not available for editing.If you still need to put it on something other than the last day of the month, then try posting administration documents.
Uncheck the “Automatically set time” checkbox.
Another option: Administration - Personal settings - Working date (set the desired date and re-post the document for calculating Salaries and Contributions) /
The bug was fixed in the latest release:
Question 2: how to change the personnel number of an employee in “1C: Accounting 8” (rev. 3.0)?
You need to go to the Employee’s card, click on the “More” -> “Change Form” button. Check the box “Tab. Number".Then the field will be available for editing.
In the field that appears, click “Yes”.

Question 3: how to calculate an advance to an employee in 1C: Accounting 8 (rev. 3.0)?
The program implements two methods for calculating the advance:Fixed amount;
Percentage of salary (percentage of all planned employee accruals).
An advance is a payment, not an accrual.
Therefore, the calculation and payment of advance wages in the form of a fixed amount or an amount as a percentage of the salary (it includes all planned employee accruals) is made using the following documents: Statement to the cash register(chapter Salary and personnel - Salary - Cash register statements) or Statement to the bank.

Question 4: how to add a foreign currency account in “1C: Accounting 8” (rev. 3.0)?
Answer: To add a foreign currency account to the program first you need to add foreign currency to the currency directory. Only after this will account 52 be displayed in the chart of accounts, and in the “Bank Accounts” directory you can create a foreign currency account.Adding a foreign currency account:
- Menu: Main-Organizations.
- Select the required organization by double-clicking on it with the left mouse button (or press the “F2” button).
- Follow the "Bank Accounts" hyperlink.
- "Create" button.
- Enter the bank's BIC and foreign currency account number.
- The “Account currency” field is determined automatically in the program based on the number of the entered foreign currency account.
- “Save and close” button.


Question 5: where to indicate the amount of the acquiring bank’s commission in “1C: Accounting 8” (rev. 3.0)?
When accepting payment by payment cards from customers in the 1C: Accounting 8 program (rev. 3.0), it is necessary to take into account the terms of service of the acquiring bank. To reflect the amount of the bank commission, you must do the following:- Menu: Sales - Retail sales-Retail sales report.
- On the “Non-cash payments” tab in the “Types of Payments” directory, indicate the size of the servicing bank’s commission: a fixed percentage or floating depending on the transaction amounts.
- Section bank and cash desk transactions on payment cards cell type of payment create.

The timesheet in 1C ZUP 8.3 is kept for those employees whose wages depend on the amount of time worked (temporary workers).
There are two ways to record time worked:
- Accounting for deviations from planned time. In this case, all absences from work (time off, vacation, sick leave, etc.) are recorded. This accounting method also reflects unplanned work (overtime).
- This method reflects not only unplanned work and absences, but also time worked according to the schedule - continuous registration.
If you are wondering where to find the time sheet in 1C Accounting 8.3, I won’t bother you - it’s not there. For the purposes of extended accounting for salary, the 1C ZUP 8.3 solution is specially purchased. We'll talk about her.
The first thing is necessary for the current year (for the year of keeping the timesheet). From the Setup menu, select Production Calendars.
If the calendar has not been previously created, it must be created and filled out automatically, checking for correctness and making changes if necessary.

Opening hours
After filling out the production calendar in 1C ZUP, you need to create and fill out employee work schedules. To do this, go to the “Settings” menu and select “Employee work schedules”. 
The schedule can be filled out automatically and adjusted if necessary.

Work schedules can be set for employees using documents such as “Hiring” and “Personnel Transfer”.
ZUP has the ability to massively change the work schedule of employees.
In such situations, when an employee’s working conditions have changed for a certain period of time (for example, a shortened day), individual schedules are indicated for them. Setting up individual schedules is located in the “Salary” menu. If an employee has an individual schedule for a certain period, the program will not take into account the main one.
Filling out a time sheet in 1C ZUP
The timesheet in 1C ZUP 8.3 is located in the “Salary” section, item “Timesheets”. The timesheet uses the designations that are found in the “Types of Use of Working Time” directory. If it is necessary to indicate several types of time, each of them is indicated on a separate line.
The timesheet can be filled out automatically, adjusting the data if necessary. Some enterprises use ACS (access control and management systems). The whole point is that all inputs and outputs are recorded using an electronic access system. This data can be uploaded to a time sheet, eliminating the need to maintain it manually.

In order to be able to change the data in the timesheet regarding the work schedule, in the program settings you need to uncheck the “Check that actual time corresponds to planned” checkbox. Otherwise, if the timesheet indicates working hours, for example, on a day off according to the work schedule, the document will not be posted.
It should be remembered that when maintaining both time sheets and reflection documents at the same time, the time sheet will have the highest priority when receiving time worked for payroll calculation.
Form T-13
In 1C ZUP 3.1, there is a printed form “T-13” for viewing time worked. You can generate this report from the “Salary” section by selecting “Salary reports”. The report you need will be called “Time Sheet T-13”.

Hello, our dear partners, friends and random visitors to our site. Today I want to talk to you about another interesting and important change in the 1C Accounting 8.3 program, which went unnoticed for many of you. Namely: did you know that now in order to print a “Time Sheet” you do not have to buy a separate program or download a form on the Internet. Now this document will help you make Accounting 8.3!
Let's see where to find it and how it is filled in in the program.
In the “Salaries and Personnel” section in the “Personnel Accounting” menu, open “HR Reports”.

In the window that opens, select the “Timesheet” report

The report allows you to select a specific department. If the “Division” flag is not set, then the Timesheet will be generated for all departments. Each division is on a separate sheet.
In this case, information on employees is filled out in accordance with the production calendar and the “Sick Leave” and “Vacation” documents entered in the program.

By default, the program does not fill in data about the employees signing the document. To print information about signers, use the “Settings” button.

In this case, the entered data will be reflected in the Timesheet for all departments.

In addition, the program has the ability to generate a Time Sheet only for selected employees. To do this, in the report settings, you need to check the appropriate box and select from the list of employees those for whom you want to print the document:


That's all I wanted to introduce you to today. WITHStay tuned for updated articles on our website. Join our social groups. networks and always be aware of all changes in the program. Work in 1C Accounting with pleasure.
Send this article to my email
A personnel number in 1C is a special digital or symbolic-numeric code that is assigned once to an employee being hired. Most organizations typically use a personnel system using such numbers. Throughout the entire period of work of the employee, the personnel number does not change. In case of dismissal of an employee and his return back to the organization, in practice he will be assigned the same number that he previously had. This avoids unnecessary confusion. It should be noted that the labor legislation does not establish the procedure for assigning a number and the organization can approve it independently, at its discretion. All these points must be enshrined in a document that reflects the personnel policy of the organization.
In addition, numbers can be assigned not only to those employees who are on the payroll, but also to temporary employees, external part-time workers and seasonal workers.
The presence of numbers helps facilitate the work of specialists from different departments of the organization. Various notes are made using the personnel number that affect the calculation of wages. In addition, the unique number makes it possible to easily find all the necessary information related to vacations, time off, sick leave, data on the salary of each employee, etc. Another important feature of using numbers is that they help keep track of the employee’s time at work.
If you have questions on the topic of personnel number in 1C, ask them in the comments under the article, our specialists will try to answer them.
Let's look at how personnel numbers are assigned in 1C, using the Accounting configuration as an example. To do this, go to the “Directory” section of the program and select the “Employees” directory. A list of all employees will open, which will have a separate column with a personnel number.

Numbers in the program are assigned automatically when a new employee is created. Let's create a new employee. Until the element is saved, the “Tab. number” will be empty.

After recording the element, the new employee will be assigned a personnel number in order. In this example, we immediately hired an employee using a document of the same name.

In the event that the employee’s card does not have the “Tab. number”, then most likely it is simply hidden and you need to turn on its visibility. To do this, in the employee form, click on the “More” button and select the “Change form” item.

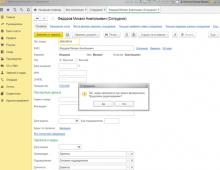
Opposite the “Tab. number” must be checked, then the field will be displayed on the form. In order to change a personnel number, you need to open the card of a specific employee, place the cursor in the field and start changing, the program will display the following message.

Click “Yes” and set the required personnel number. After which you need to save the changes. It should be remembered that if you manually change the personnel number, sequential numbering may be disrupted, since the automatic numbering system works as follows - the new entry has a value one greater than the maximum. For example, if we change the personnel number from KP00-00009 to KP00-00015, then when automatically created, the next personnel number will have the value KP00-00016.
Team of experienced 1C programmers:
From 5 minutes response time to urgent tasks, even on weekends and holidays.
30+ programmers with up to 20 years of experience in 1C.
We make video instructions on completed tasks.
Live communication through any messengers convenient for the client
Monitoring the completion of your tasks through our specially developed application
Official partners of the 1C company since 2006.
Experience of successful automation from small firms to large corporations.
99% of clients are satisfied with the results
What questions were most often asked by 1C: Accounting 8 users? If you have any other questions, ask them in the comments, experts will answer you.
Question 1: when accruing salary, I cannot set/change the accrual date
After updating to version 3.0.54.20, the “Payroll” document was modified, and the “Document Date” field is set by default to the last day of the month, which is not available for editing.If you still need to put it on something other than the last day of the month, then try posting administration documents.
Uncheck the “Automatically set time” checkbox.
Another option: Administration - Personal settings - Working date (set the desired date and re-post the document for calculating Salaries and Contributions) /
The bug was fixed in the latest release:
Question 2: how to change the personnel number of an employee in “1C: Accounting 8” (rev. 3.0)?
You need to go to the Employee’s card, click on the “More” -> “Change Form” button. Check the box “Tab. Number".Then the field will be available for editing.
In the field that appears, click “Yes”.
Question 3: how to calculate an advance to an employee in 1C: Accounting 8 (rev. 3.0)?
The program implements two methods for calculating the advance:— a fixed amount;
— a percentage of the salary (a percentage of all planned employee accruals).
An advance is a payment, not an accrual.
Therefore, the calculation and payment of advance wages in the form of a fixed amount or an amount as a percentage of the salary (it includes all planned employee accruals) is made using the following documents: Statement to the cash register(chapter Salary and personnel - Salary - Cash register statements) or Statement to the bank.
Question 4: how to add a foreign currency account in “1C: Accounting 8” (rev. 3.0)?
Answer: To add a foreign currency account to the program first you need to add foreign currency to the currency directory. Only after this will account 52 be displayed in the chart of accounts, and in the “Bank Accounts” directory you can create a foreign currency account.Adding a foreign currency account:
- Menu: Main—Organizations.
- Select the required organization by double-clicking on it with the left mouse button (or press the “F2” button).
- Follow the "Bank Accounts" hyperlink.
- "Create" button.
- Enter the bank's BIC and foreign currency account number.
- The “Account currency” field is determined automatically in the program based on the number of the entered foreign currency account.
- “Save and close” button.
Question 5: where to indicate the amount of the acquiring bank’s commission in “1C: Accounting 8” (rev. 3.0)?
When accepting payment by payment cards from customers in the 1C: Accounting 8 program (rev. 3.0), it is necessary to take into account the terms of service of the acquiring bank. To reflect the amount of the bank commission, you must do the following:- Menu: Sales - Retail Sales—Retail sales report.
- On the “Non-cash payments” tab in the “Types of Payments” directory, indicate the size of the servicing bank’s commission: a fixed percentage or floating depending on the transaction amounts.
- Section bank and cash desk transactions on payment cards cell type of payment create.